Back in late spring/early summer, Curated Quilts announced a mini quilt challenge with the theme “star.” The challenge instructions specified the size (10″ to 16″ square) and the color palette ( peach, coral, violet, plum, denim, dark teal and light grey) but left the rest of the creative process to quilt artists. I got really excited when I saw the challenge and almost immediately had an idea that I wanted to experiment with.

My creative process often involves a small sketch of what I have in mind, and then I start thinking about techniques to turn my vision into reality. In this case, I knew that I wanted to play with the most basic visual of a star, the kind that pops into non-quilters’ minds when they hear the word. So, something more like the one on the left than the one on the right.
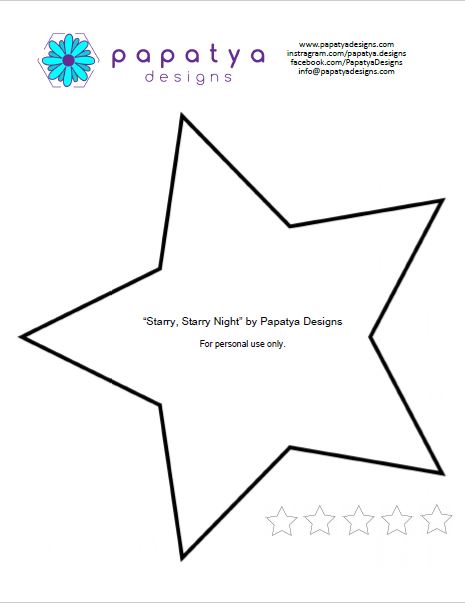
With that in mind, I drew a template of a star that I ended up using in this quilt. I also made a smaller size star with the same exact shape as the large one.
You can download the PDF template by clicking here if you’d like to make a Starry, Starry Night yourself.
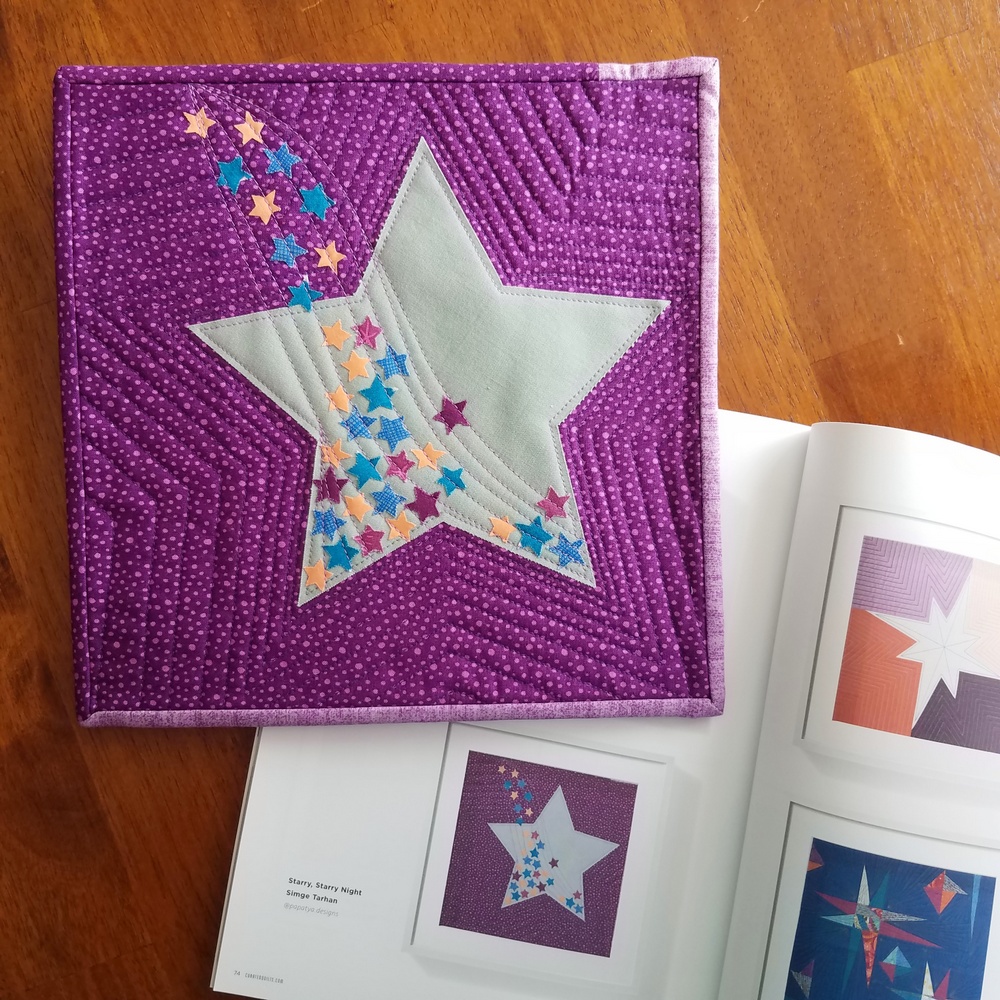
Before I go into the details of how I proceeded with this project, let me first show you the finished quilt alongside its picture that appeared in the Stars issue of Curated Quilts. This mini ended up being 11″ square.
So, how did I make Starry, Starry Night?
Step 1 – Deciding on the technique
Because of the shape of the star, I didn’t want to deal with y-seams or imperfectly turned edges, and so I decided to use the raw edge applique method. I really like this method as it allows me to use my imagination to the fullest without having to limit my creations to those that can easily be pieced or those with smooth curves that can easily be turned under.
I generally use two products for raw edge applique. One is called Lite EZ-Steam II and is manufactured by Pellon. The other one is called Lite Steam-A-Seam 2 made by the Warm Company. They work in the same exact way, and they are comparable in ease of use and quality of outcomes. However, Lite EZ-Steam II seems to stiffen up the fabric a little bit, which may or may not be desirable based on your preferences and the needs of the project. In this particular project, I used Lite EZ-Steam II.
Both of these products are double-sided fusible webs. You draw or trace the shape you want on one side of the product, peel the paper off on the other side of it and stick the web to your applique fabric. You cut out the shape and peel off the paper to stick your applique onto the background fabric. The temporary hold of the product allows you to reposition the shape (Lite Steam-A-Seam 2 is a bit easier to reposition in my experience), and once you finalize the position, you iron on the applique using manufacturer instructions.
Step 2 – Tracing the shape
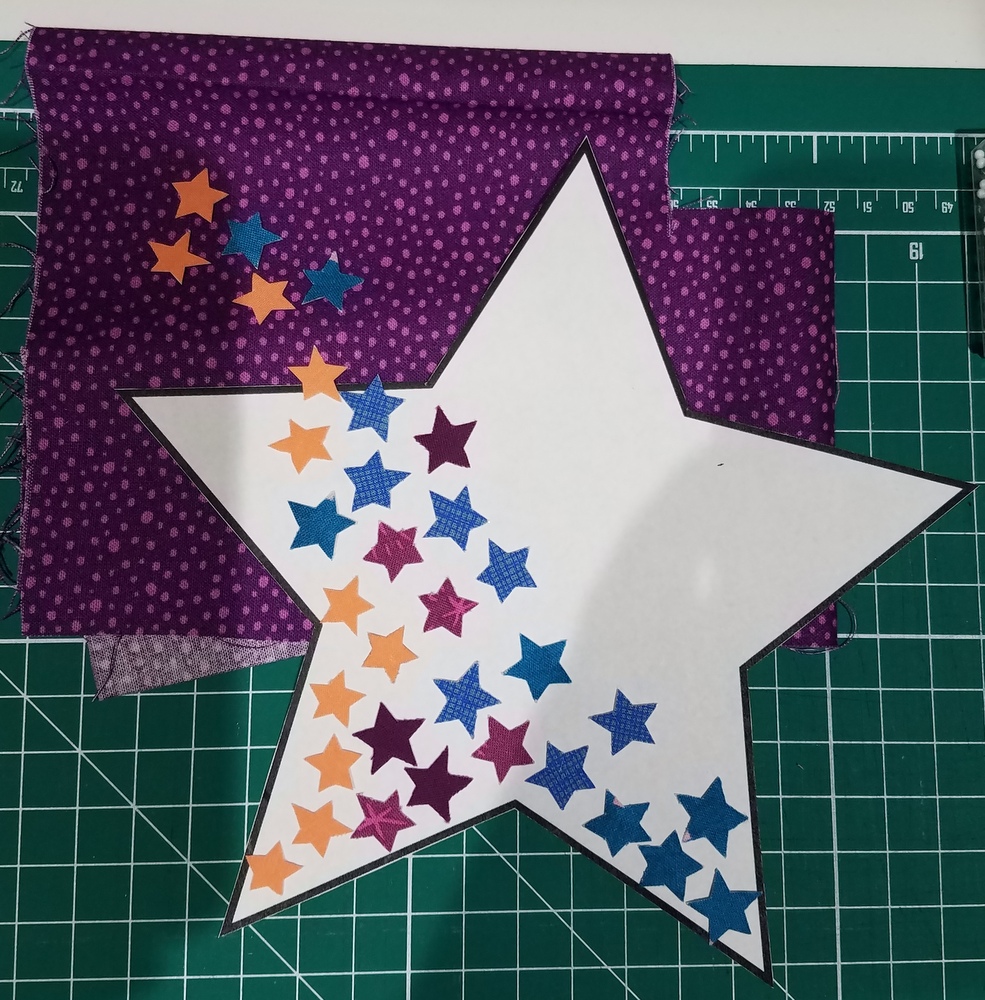
One way to trace the star on the paper is to cut out the shape and trace around it using a pen or pencil, which is what I did in this case. Alternatively, especially if you don’t want to cut out your template, you can use a light box to see the shape you’ll trace. The light box would also allow you to more accurately trace the small star.
Step 3 – Choosing the colorway and fabric
This step was quite easy in a way, since the challenge specified the colors that needed to be used. If I wasn’t bound by those specifications, however, this is how I would have proceeded:
I’d pick the background fabric first. Something that looks like the night sky or outer space, for example. I would then pick the color/fabric of the large star, something that stands out from the background but also plays well with other colors that you’ll pick for the small stars. (I picked a solid gray to make sure the little stars would all be clearly visible.) And then the small stars. I really wanted to use metallic prints, but was unable to find one that fit the challenge specifications. But since you’re not limited by a challenge, you can go wild! 🙂 For example, if the fabric has star prints, you can fussy cut those rather than using the template.
Step 4 – Finalizing the design
This was probably the most challenging (and also the most fun) part! I was once again limited in my choices because the challenge specified that the finished quilt had to be a square and between 10 and 16 inches. If I didn’t have this restriction, I think I would have probably chosen to make this quilt a rectangle to give the sense of a vast space behind the star. (The rectangle would have been wider than its height.)
So, if you’re making one yourself, I encourage you to play around with the idea of how big and what shape you want yours to be!
The next design decision is about the placement of the large star. I didn’t want it to be directly in the middle of my “canvas.” So, I chose to offset it slightly, again being constrained by the requirement that it needed to be a square. If you’re choosing a rectangular background, the offset could be even more dramatic!
And finally, the positioning of the small stars!
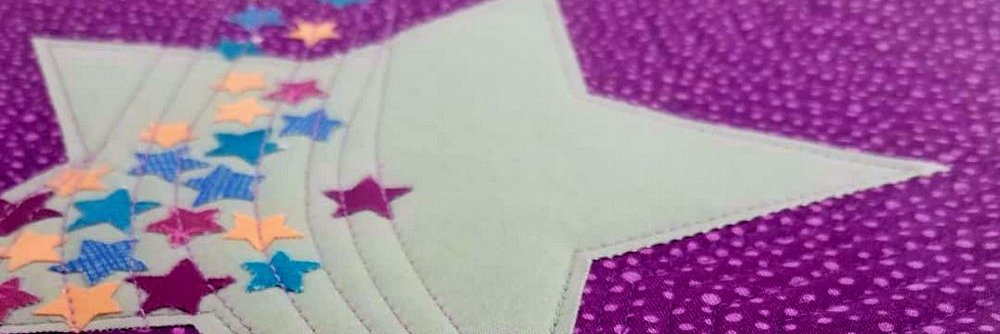
I wanted to make sure that the placement of the little stars gave a feeling of smooth movement. I wanted the quilt to be a snapshot of an ongoing process of little stars being poured into the large star.
While finalizing the placement of the little stars, I was also thinking about the quilting design. Once I decided that I’d quilt smooth curves, I used my finger to trace the curves and determined the location of the stars accordingly. One goal I had in mind was to have at least one quilting line on each star, not only to secure the stars in place but also to show the route each star took to find its position.
Step 5 – Quilting
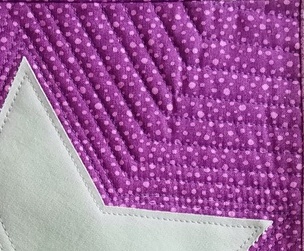
First, I traced along the edges of the star to secure it in place. I then chose to echo-quilt around the star to give the impression that it’s emitting light. I increased the distance between echo lines in every round to make the design more dynamic.
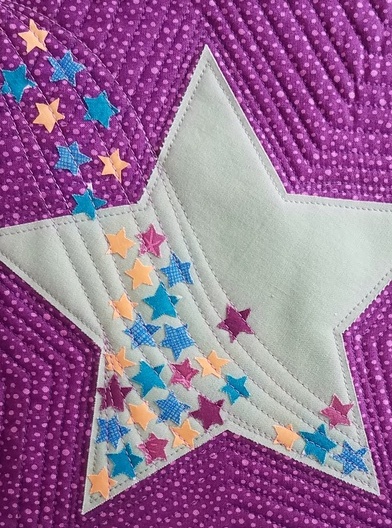
Then, I quilted smooth curves to add more movement to the quilt and to depict how the little stars are moving. I used a light gray thread that would blend in with both the background and the stars. You can create an alternative (and arguably more whimsical) look by using metallic thread!
Step 6 – Binding
I ended up using a two-color binding, but it wasn’t my first choice! I actually wanted to use just the background fabric so that there wouldn’t be an end to the background. (You can also get this effect by facing your quilt rather than binding it. Here is a good tutorial for facing quilts.)
However, I ran out of fabric! 🙂 So, I ended up going for a two-color binding! I actually love it when little surprises/mishaps like this challenge me and result in a better design than I originally planned!
So, there you have it! Are you planning on making a Starry, Starry Night yourself? How will you customize it? Share your ideas below, and make sure to share your progress and final mini quilt on Instagram using #papatyadesigns and #starrystarrynightquilt!
Click here to download the large and small star templates.