
Click here to see the schedule of the sew-along, where you can also access the previous posts for the sew-along.
Happy Wednesday, fellow Illusionists! I hope you’ve enjoyed preparing all your flying geese (FG) units last week! This week we’ll start the most fun part of the project – assembling the blocks!
Before I talk about that though, I’d like to hear from you! I’ve set the pace of the sew-along slow and easy since it’s the summer and a lot of us find ourselves spending time outside of our sewing rooms! However, as I was looking at our schedule for the remaining weeks, I couldn’t help but wonder if three blocks a week is a bit too slow. I want to hear from you, since I’ve designed this sew-along primarily for you! Would you rather speed up the rest of the process, perhaps assemble 5 blocks this week and then assemble the rest of the quilt next week? Let me know by leaving a comment here or on Instagram or Facebook. I look forward to your feedback!
Going back to assembling the blocks, as long as you’ve organized your half square triangle (HST) and FG units, this should be a breeze! However, I do recommend that you slow down to make sure your points match and the blocks are pressed appropriately. With so many seams, making sure that your blocks lay flat at this stage will help a lot when it comes to quilting.
I’ve got a few tips on assembly. We’re used to assembling units in a row and then attaching rows to one another. However, I’ve found that following this conventional wisdom when you’re trying to match a lot of points may not be in your best interest. For example, if you have six units in a row (as is the case for some of the Illusion blocks), you’d have to match five points at a time. If you’re off just a bit at each point, by the time you reach the fifth, you’ll be off by quite a bit.
Instead, you can assemble these two rows as three sets of four patches. This way, you wouldn’t be trying to match more than one point at a time.

The other tip I have is on assembling FG so that you have distinct tips of the triangles. When you’re attaching a FG unit to any other unit, make sure that the FG is on top so that you have a clear view of where the tip of the triangle is (see where the arrows point to in the picture below).
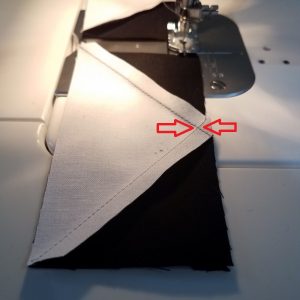
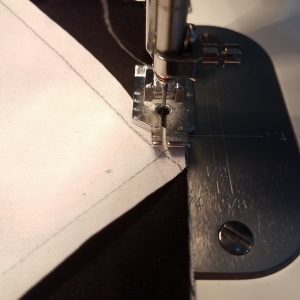
If that point is not a quarter inch away from the edge of the fabric you’d miss it when sewing! If you stitch to the left of it, your triangle won’t have a distinct tip. If you stitch to the right of it, you’ll have too much fabric showing at the seam. So, it’s important to hit that point when you’re attaching FG units. Slow down if necessary as you get close to it and make sure that the needle hits the point exactly.
My final tip is on pressing. When pressing the blocks, especially if you’re assembling the blocks patch by patch rather than row by row (as I’ve recommended above), pay attention to the direction you press your seams. Think about the next block you will assemble, and how the two blocks will come together. You want your seams to nest (if you’re not pressing them open) when you combine the blocks together. So, keep an eye on that!
I hope these tips will help make the assembly process more fun!
For the over-achievers: Assemble as many blocks as you like, and keep thinking about how you want to quilt Illusion! Also, don’t forget to give me feedback on the pace of the sew-along!
So now, let the fun continue! I look forward to seeing your blocks! Don’t forget to share your progress here in the comments or on Instagram using #papatyadesigns and #IllusionSAL!
If you have any questions or feedback, don’t hesitate to leave a comment!
The SAL pace is good for me. For the most part I am able to keep up without feeling overwhelmed.
Thank you for the feedback, Dawn!